
What is a football water station? A football water station is a dedicated setup designed to provide easy access to hydration for athletes during practices, games, or tournaments. Can I make one myself? Absolutely! This guide will show you how to build your own football water station with readily available materials, transforming a simple cooler into a DIY sports cooler or a portable drink station. Who is it for? It’s perfect for coaches, team parents, or any sports enthusiast looking for a practical team hydration solution or an outdoor beverage dispenser.
Gathering your supplies is the first step in creating a functional and efficient soccer water setup. Whether you’re preparing for a casual match or a competitive sports event cooler, having a well-stocked water station can make all the difference. This guide will walk you through creating a robust bulk water container system, resulting in an easy-to-build water bar that will keep everyone refreshed for game day refreshment or a demanding tournament drink station.
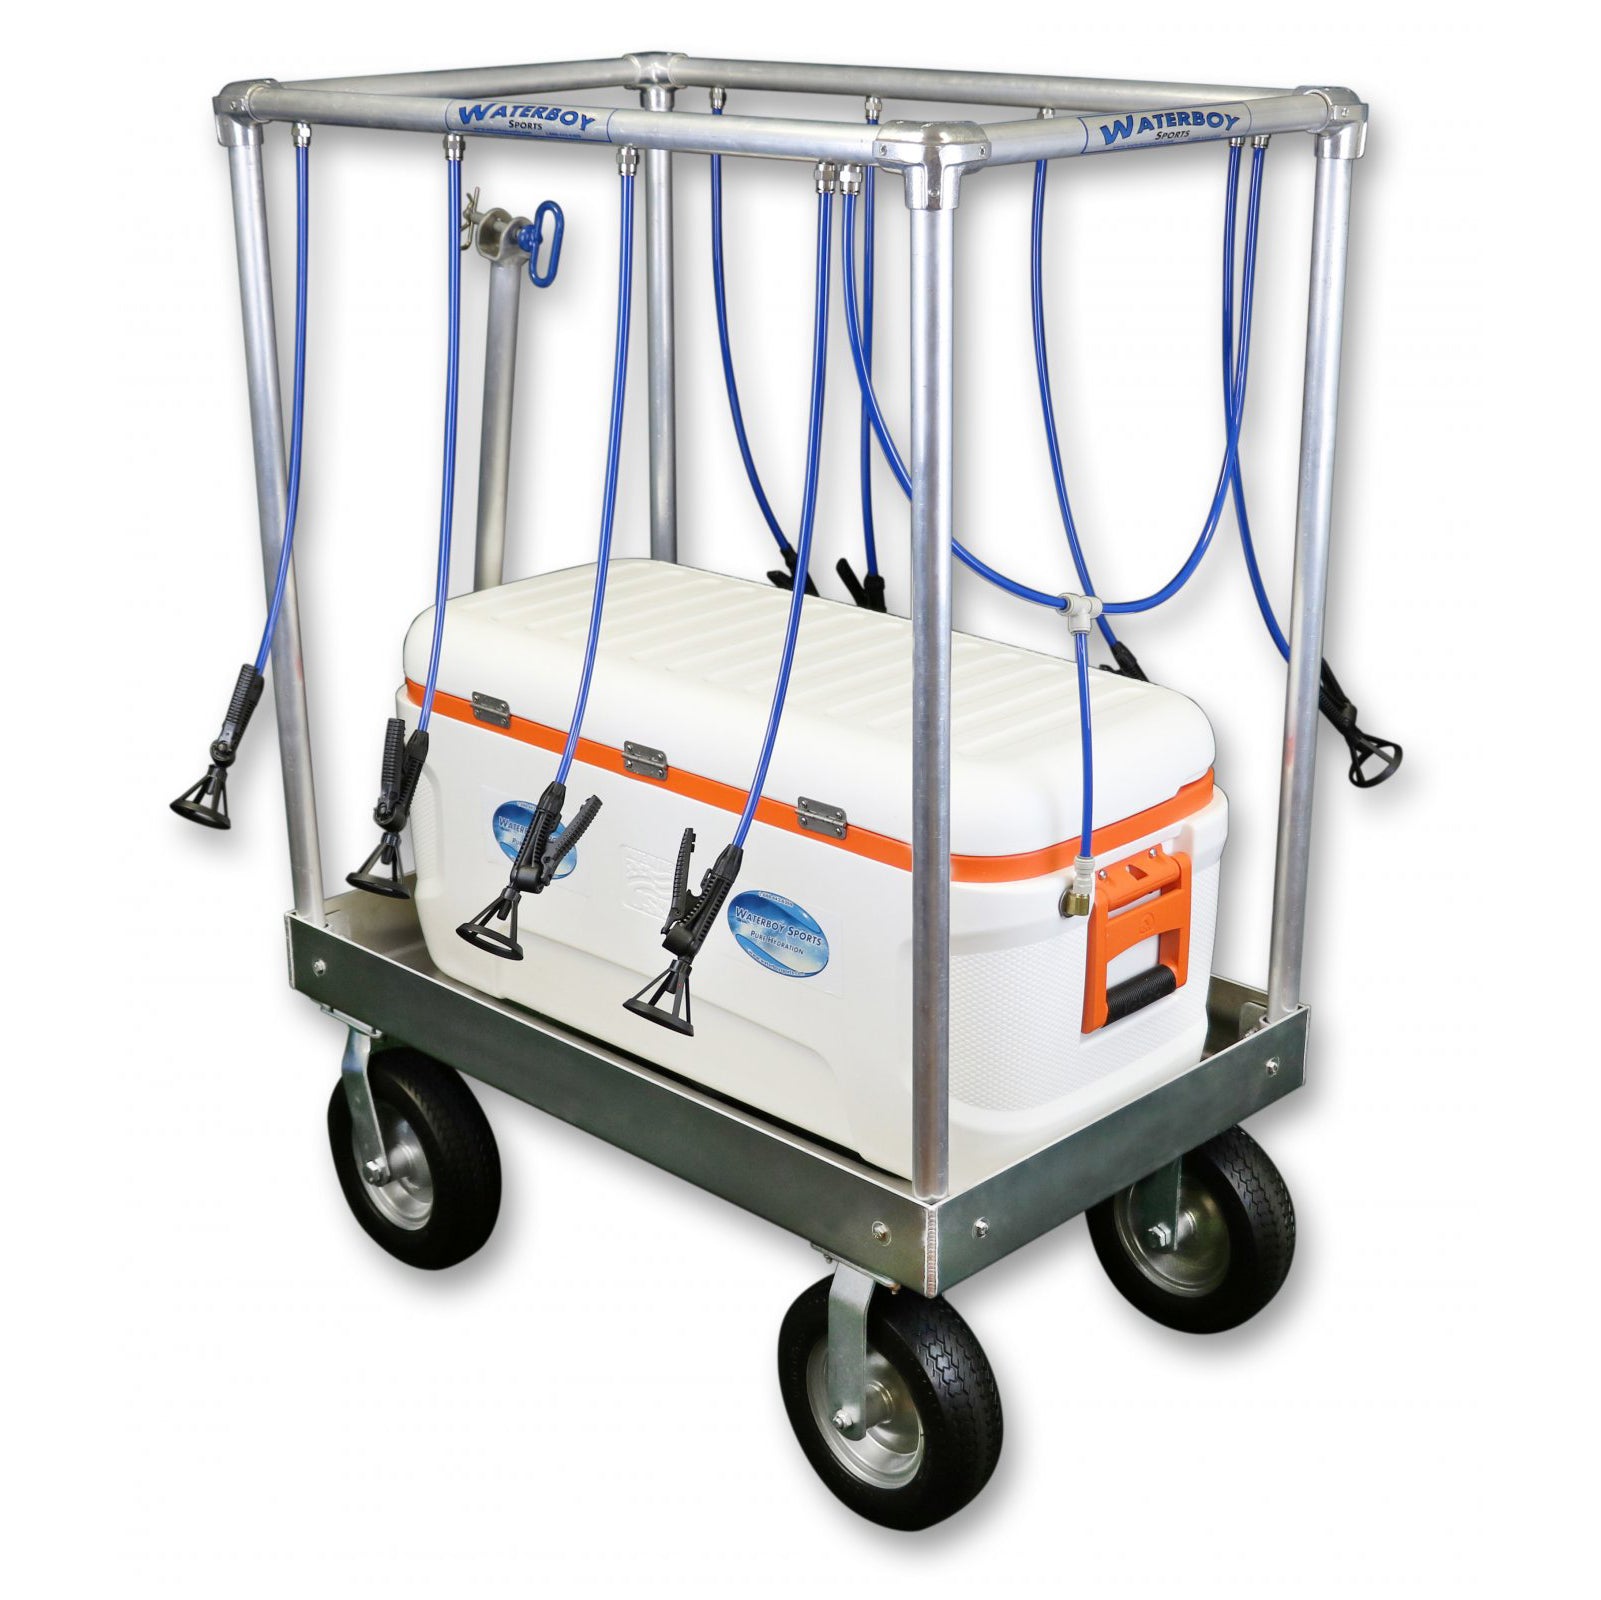
Image Source: www.anytimesportssupply.com
Planning Your Football Water Station
Before you start building, take some time to plan. Consider the size of your team, the duration of your events, and the space you have available. A little foresight can save you a lot of hassle later.
Key Considerations:
- Team Size: How many players will need access to water? This will determine the capacity you need.
- Event Length: Are you setting up for a short practice or a full-day tournament? Longer events require more water.
- Portability: Will you need to move the station frequently? If so, consider wheels or lighter materials.
- Durability: The station needs to withstand outdoor conditions and regular use.
- Ease of Use: Players should be able to get water quickly and without spills.
- Budget: Determine how much you’re willing to spend. Many effective solutions can be made affordably.
Essential Components of Your Water Station
A basic football water station typically includes a cooler to hold ice and water, cups or a dispenser, and sometimes additional items for convenience.
The Cooler: The Heart of the Station
The cooler is the most crucial part. It needs to be large enough to hold a significant amount of water and keep it cold.
Types of Coolers to Consider:
- Standard Hard-Sided Coolers: These are common, affordable, and offer good insulation. They come in various sizes.
- Rolling Coolers: If portability is a major concern, a cooler with wheels can be a game-changer.
- Large Beverage Coolers/Tubs: These often have spigots, making them very convenient for dispensing.
Dispensing Options: Cups vs. Dispensers
How will players access the water? This is a key decision for ease of use and waste reduction.
Cup Dispensing:
- Pros: Simple, widely understood, easy to replace cups.
- Cons: Can lead to a lot of plastic waste, cups can blow away, requires a holder.
Water Dispenser:**
- Pros: More eco-friendly, less chance of spills, can be more hygienic.
- Cons: Requires a cooler with a spigot or a separate dispenser attachment, can be more expensive upfront.
Additional Useful Items:
- Ice: Essential for keeping the water cold.
- Water Bottles/Reusable Cups: Encourage players to bring their own.
- Trash Can/Recycling Bin: For disposing of used cups or bottles.
- Towels: For wiping up spills.
- Signage: Clearly label the station.
- Cup Holder: To keep cups organized and prevent them from scattering.
Building Your DIY Football Water Station: Step-by-Step
Let’s get hands-on! We’ll explore a few different approaches, from the simplest to slightly more elaborate setups.
Method 1: The Super Simple Cooler Setup
This is the quickest and easiest way to get a hydration station up and running.
Materials:
- 1 large cooler (at least 50-quart capacity recommended)
- Plenty of ice
- Bottled water or large jugs of pre-filled water
- Paper cups or reusable water bottles
Instructions:
- Clean the Cooler: Ensure your cooler is clean and dry.
- Fill with Ice: Fill the cooler about halfway to two-thirds with ice. This is crucial for keeping the water cold.
- Add Water: Pour in your pre-filled water jugs or bottles. Leave some space at the top for air circulation.
- Close and Chill: Close the cooler tightly and let it sit for about 15-20 minutes to ensure the water gets cold.
- Set Up: Place the cooler in an accessible location on the sideline.
- Add Cups: If using cups, place them in a sturdy cup holder nearby or stack them neatly.
- Supervise: Ensure players hydrate responsibly and dispose of cups properly.
Method 2: The Cooler with a Spigot
This method enhances convenience by allowing players to fill their own bottles or cups directly from a spigot.
Materials:
- 1 cooler with a built-in spigot, or a cooler and a spigot kit
- Ice
- Large water jugs or a bulk water container to fill the cooler
- Paper cups or players’ reusable water bottles
- Optional: A small table or stand to elevate the cooler for easier access
Instructions (if your cooler doesn’t have a spigot):
- Choose Your Cooler: Select a cooler with a flat, sturdy surface near the bottom.
- Gather Spigot Kit: You’ll need a food-grade spigot, a rubber washer, and a nut. These are often available at hardware stores or online.
- Drill the Hole: Measure and mark the spot for the spigot, usually a few inches from the bottom of the cooler. Use a drill with a bit slightly smaller than the spigot’s threaded shaft. Drill a clean hole.
- Install the Spigot:
- From the inside of the cooler, insert the spigot through the hole.
- Place the rubber washer on the threaded shaft on the outside of the cooler.
- Screw the nut onto the threaded shaft to secure the spigot. Tighten firmly but don’t overtighten, as this could crack the cooler.
- Test for Leaks: Fill the cooler with a small amount of water and check that the spigot doesn’t leak.
- Prepare the Cooler:
- Fill the cooler with ice.
- Add your water.
- Ensure the spigot is turned off.
- Elevate (Optional): Place the cooler on a table or stand to make dispensing easier.
- Set Up: Position the cooler where players can easily reach it.
- Provide Cups/Bottles: Have cups available or encourage players to use their own bottles.
Method 3: The Elevated Beverage Dispenser Station
This creates a more structured and accessible outdoor beverage dispenser experience.
Materials:
- 1 large cooler with a spigot
- 2-3 large water jugs or a bulk water container
- Ice
- Paper cups or reusable water bottles
- A sturdy folding table (18-24 inches wide)
- Optional: A second cooler for ice refills, a small trash can, signage
Instructions:
- Prepare the Cooler: Follow the steps in Method 2 to ensure your cooler is ready and leak-proof.
- Chill the Water: Fill the cooler with ice and water and let it chill.
- Set Up the Table: Unfold your folding table on the sidelines, choosing a spot that is easily accessible to players.
- Place the Cooler: Position the water-filled cooler on the table. Ensure it’s stable and won’t tip over. Place it towards the back or side of the table to leave space.
- Organize Supplies:
- Place a stack of cups or a cup dispenser next to the cooler.
- Have a trash can nearby for used cups.
- If you have a second cooler with extra ice, place it within easy reach.
- Add Signage: Create a clear sign that says “Water Station” or “Hydration Stop.”
- Maintain: Periodically check the ice levels and replenish as needed.
Method 4: The “Water Bar” for Multiple Needs
This setup can accommodate different types of beverages and cater to a larger group, functioning as a true easy-to-build water bar.
Materials:
- 2-3 large coolers (one for water, one for ice, potentially one for sports drinks)
- Ice
- Water jugs or a bulk water container
- Sports drink powder or pre-mixed sports drinks (optional)
- Paper cups, reusable bottles, or a dedicated sports drink dispenser
- A large, sturdy table or multiple tables
- Trash and recycling bins
- Signage for each cooler (e.g., “Water,” “Ice,” “Sports Drink”)
Instructions:
- Design Your Layout: Decide how you want to arrange your coolers and table for maximum efficiency.
- Prepare Coolers: Set up each cooler for its intended purpose (water, ice, sports drinks). Ensure any spigots are working correctly.
- Stock the Coolers:
- Fill the water cooler with ice and water.
- Fill the ice cooler with ample ice for refilling the water cooler or for players to add to their own bottles.
- If using sports drinks, prepare them in the third cooler.
- Set Up the Table: Arrange your table(s) to accommodate all coolers and supplies.
- Organize Supplies:
- Place cups near the water and sports drink coolers.
- Position trash and recycling bins strategically.
- Consider a small tarp or mat under the coolers to catch any drips.
- Add Clear Signage: Label each cooler clearly so players know where to get what they need.
- Ensure Accessibility: Make sure players can easily access each cooler without bumping into each other.
Optimizing Your Football Water Station
Once you’ve built your station, consider these tips to make it even better.
Keeping Water Cold: The Ice Factor
- Block Ice: Large blocks of ice melt slower than cubed ice, keeping your water colder for longer. You can make these using disposable foil pans or plastic containers.
- Frozen Water Bottles: Freeze some of your water bottles. As they melt, they provide cold water and act as ice packs.
- Ice Packs: Use reusable ice packs in your cooler for extra chilling power.
- Pre-Chill: If possible, chill your water jugs in a refrigerator before filling the cooler.
- Insulation: Consider wrapping your cooler with a blanket or insulation wrap for added temperature retention, especially on very hot days.
Portability and Stability: Wheels and Weigh-Downs
- Wheeled Coolers: As mentioned, coolers with wheels are excellent for moving your station.
- Dollies or Carts: If you have a non-wheeled cooler, a small utility cart can make transport much easier.
- Weighting: On windy days, place heavy items like water jugs inside the cooler or place sandbags around the base of your table to prevent it from blowing over.
- Securing Spigots: Ensure spigots are tightly secured to prevent leaks when moving the cooler.
Waste Reduction and Sustainability:
- Encourage Reusable Bottles: This is the most significant way to reduce waste. Make a clear announcement or place signs encouraging players to bring their own bottles.
- Biodegradable Cups: If using disposable cups, opt for biodegradable or compostable options.
- Water Refill Station: Set up your station primarily as a refill point for reusable bottles.
Enhancing User Experience:
- Clear Signage: As reiterated, clear labels are crucial for a smooth operation.
- Adequate Space: Ensure there’s enough room around the station for players to gather without causing congestion.
- Shade: If possible, position your water station in a shaded area to keep the water cooler and the station itself more comfortable to approach.
- First Aid Proximity: Consider placing the water station near your first aid kit or designated first aid personnel.
Maintaining Your Water Station During an Event
A well-maintained water station ensures continuous hydration and player satisfaction.
During the Game/Practice:
- Monitor Ice Levels: Add more ice as needed to keep the water consistently cold.
- Refill Water: As water is consumed, add more pre-chilled water.
- Empty Trash: Regularly empty trash and recycling bins to prevent overflow.
- Wipe Spills: Keep a towel handy to wipe up any spills around the cooler or on the table.
- Check Spigots: Ensure spigots are turned off when not in use to prevent accidental leaks.
Post-Event Cleanup:
- Empty Coolers: Drain all remaining water and ice.
- Clean Coolers: Rinse coolers thoroughly with soap and water. Allow them to air dry completely before storing.
- Wash Spigots (if applicable): Detach and clean spigots if possible.
- Dispose of Waste: Properly dispose of any used cups, bottles, or packaging.
- Clean Table and Supplies: Wipe down the table and any other accessories.
Frequently Asked Questions (FAQ)
- Q: How much water do I need for a team?
A: A general guideline is to have at least 1 gallon of water per player for a 2-hour event, more in hot weather or for intense activity. It’s always better to have too much than too little. - Q: Can I use tap water?
A: Yes, as long as your local tap water is safe for drinking. However, pre-filling jugs and chilling them is recommended for better temperature control. - Q: What’s the best way to keep water cold without ice?
A: While ice is the most effective, insulated coolers themselves will slow down warming. For longer events without ice replenishment, consider frozen water bottles that melt over time. - Q: My cooler is leaking around the spigot. What should I do?
A: Ensure the rubber washer is properly seated and the nut is tightened securely. If it still leaks, you might need to replace the washer or seal the area with food-grade silicone sealant. - Q: How do I make my station more appealing?
A: Use colorful signage, team logos, and perhaps even a small plant or banner to make it look more inviting.
Building your own football water station is a rewarding project that directly contributes to the well-being and performance of your team. With these DIY guides, you can create a functional, affordable, and effective team hydration solution that will serve you well for many seasons to come. Whether you’re aiming for a simple DIY sports cooler or an elaborate outdoor beverage dispenser, the key is to prioritize cold water, easy access, and a well-organized setup. Enjoy the game, and stay hydrated!