
Can you mold a football mouthguard at home? Yes, most football mouthguards are designed to be molded at home using a simple boil and bite mouthguard process, allowing for a custom fit mouthguard. This guide will walk you through how to mold a football mouthguard for optimal sports dental protection. A properly fitted mouthguard is crucial for any athlete mouthguard fitting, especially in a high-impact sport like football.
Molding your football mouthguard correctly ensures it stays in place, protects your teeth and gums, and allows you to breathe and communicate effectively on the field. A poorly fitted mouthguard can be a distraction, offer less protection, and even become a safety hazard. This comprehensive guide will cover everything you need to know about how to shape mouthguard for the ultimate football mouthguard molding experience, ensuring you have the best football mouthguard for your needs. We’ll focus on safe mouthguard molding techniques to give you a comfortable and secure dental protector for football.
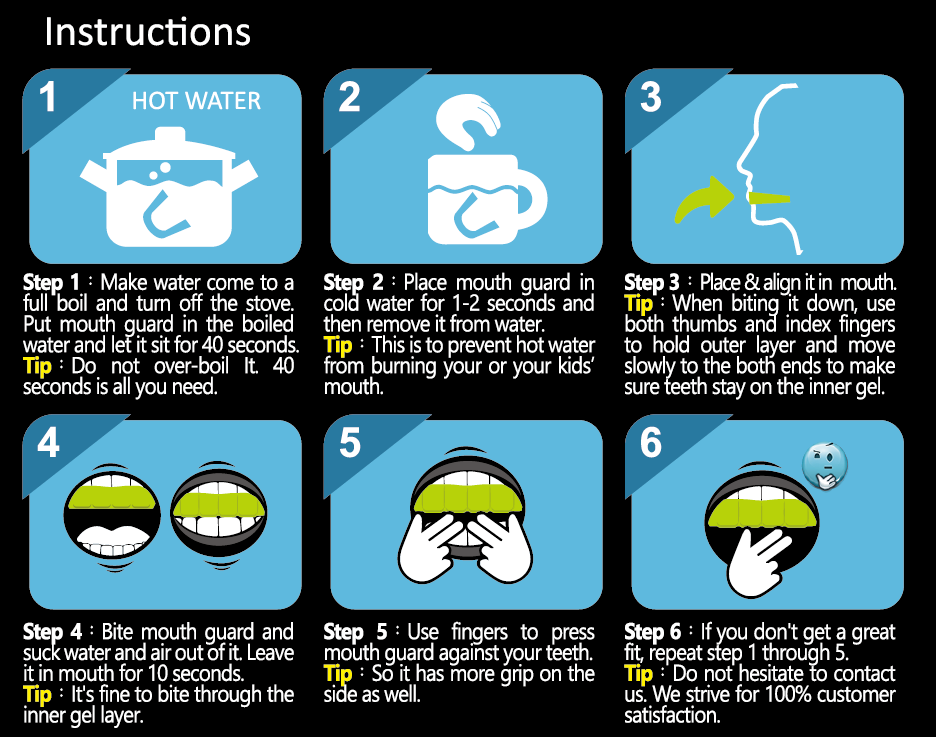
Image Source: www.oralmart.com
Why a Proper Fit Matters for Football Mouthguards
Football is a sport with inherent risks, and collisions are part of the game. This is where sports dental protection becomes paramount. A mouthguard acts as a crucial barrier, absorbing and dissipating the forces of impact that could otherwise lead to chipped teeth, broken jaws, knocked-out teeth, and even concussions. However, the effectiveness of this protection hinges on a proper fit.
A mouthguard that is too loose can fall out during play, leaving your teeth vulnerable. It can also obstruct your breathing or make it difficult to communicate with teammates. Conversely, a mouthguard that is too tight can cause discomfort, jaw pain, and even gagging.
Benefits of a Well-Molded Mouthguard
- Superior Protection: A custom fit mouthguard molds to the unique contours of your teeth and gums, providing a snug fit that offers the best possible protection against dental injuries. It can help prevent lacerations to the tongue, lips, and cheeks.
- Comfort and Stability: When molded correctly, your mouthguard will stay securely in place, even during strenuous activity and contact. This means you won’t have to worry about it shifting or falling out, allowing you to focus on the game.
- Improved Breathing and Communication: A well-fitted mouthguard is designed not to interfere with your ability to breathe through your mouth or nose. It also allows for clearer communication with coaches and teammates, which is essential for effective play.
- Reduced Risk of Jaw Injury: The proper molding process can help position your jaw correctly, potentially reducing the forces transmitted to the temporomandibular joint (TMJ) during impact.
What Makes a Mouthguard a “Boil and Bite” Mouthguard?
The term “boil and bite mouthguard” refers to mouthguards made from a thermoplastic material. This material softens when heated in boiling water, becoming pliable and easy to mold. Once the material has cooled slightly and is placed in your mouth, it hardens around your teeth and gums, creating a personalized fit. This is the most common type of mouthguard available to athletes for DIY fitting.
Gathering Your Materials for Football Mouthguard Molding
Before you begin the football mouthguard molding process, ensure you have all the necessary items ready. Having everything within reach will make the athlete mouthguard fitting smoother and more efficient.
Essential Items You’ll Need:
- Football Mouthguard: Ensure it’s a new, unwrapped mouthguard specifically designed for sports.
- Pot or Saucepan: For boiling water.
- Measuring Cup or Thermometer: To ensure the water is at the correct temperature (usually around 170-190°F or 77-88°C).
- Slotted Spoon or Tongs: To safely remove the hot mouthguard from the water.
- Bowl of Ice Water: To quickly cool and set the mouthguard after molding.
- Mirror: To help you see what you’re doing during the fitting process.
- A Clock or Timer: To track how long the mouthguard is in hot water.
- Towel: For drying your hands and face.
Step-by-Step Guide to Molding Your Football Mouthguard
Follow these instructions carefully to achieve the perfect fit for your dental protector for football. Remember, safe mouthguard molding is key to both effectiveness and safety.
Step 1: Prepare the Water
This is the most critical step in safe mouthguard molding.
- Fill the Pot: Fill your pot or saucepan with enough water to fully submerge the mouthguard.
- Heat the Water: Heat the water on the stove until it reaches the manufacturer’s recommended temperature, typically between 170°F and 190°F (77°C to 88°C). Do not boil the water. Boiling water can melt or distort the mouthguard beyond repair. If you don’t have a thermometer, bring the water to a boil, then remove it from the heat and let it sit for about 30-60 seconds before submerging the mouthguard.
Step 2: Submerge the Mouthguard
- Hold Steady: Using your slotted spoon or tongs, carefully hold the mouthguard by the strap or the edge, ensuring it is fully submerged in the hot water.
- Time It: Leave the mouthguard in the hot water for the duration specified by the manufacturer. This is typically 30 to 60 seconds. Over-soaking can degrade the material, while under-soaking will prevent it from becoming pliable enough to mold.
Step 3: Remove and Cool Slightly
- Careful Removal: Gently remove the mouthguard from the hot water using the spoon or tongs. Be cautious, as it will be hot.
- Cooling Phase: Allow the mouthguard to cool for a few seconds. You want it to be warm enough to mold but not so hot that it burns your mouth or tongue. A good test is to touch a small, inconspicuous part of the mouthguard with your fingertip – it should be warm but not painfully hot.
Step 4: Shaping the Mouthguard
This is where the how to shape mouthguard magic happens, creating your custom fit mouthguard.
- Positioning: Place the slightly cooled mouthguard into your mouth. Ensure it is positioned correctly, covering your upper teeth.
- Biting Down: Bite down gently but firmly onto the mouthguard.
- Molding with Tongue and Fingers: Use your tongue to press the mouthguard against the roof of your mouth and the sides of your teeth. Simultaneously, use your fingers on the outside of your mouth to press the material firmly against your teeth and gums. You want to create an imprint of your entire dental arch.
- Suction Technique: Suck in strongly. This helps to create a vacuum seal, further molding the mouthguard to your teeth and ensuring it stays in place.
- Hold: Hold this position for about 20-30 seconds, or until the mouthguard begins to feel firm.
Step 5: Immerse in Ice Water
- Quick Chill: Carefully remove the mouthguard from your mouth.
- Set the Mold: Immediately plunge the molded mouthguard into the bowl of ice water. This rapid cooling process sets the shape and hardens the material, locking in the custom fit.
- Leave it: Leave it in the ice water for at least a minute.
Step 6: Check the Fit and Adjust if Necessary
- Inspect: Remove the mouthguard from the ice water and inspect it. It should now feel firm and hold its shape.
- Try It On: Place it back in your mouth. Does it feel snug? Does it stay in place when you open your mouth? Can you talk without it feeling loose or obstructive?
- Making Adjustments:
- Too Loose: If the mouthguard feels loose, you can repeat the molding process. Ensure you are biting down firmly and using your tongue and fingers to create a tight seal.
- Too Tight or Uncomfortable: If it’s too tight or causing discomfort in specific areas, you can try remolding it. Sometimes, a slight adjustment in bite pressure or tongue placement can make a significant difference.
- Not Enough Coverage: If certain teeth aren’t covered, you might need to ensure the mouthguard is positioned correctly before biting down.
Important Note: Most boil and bite mouthguard products allow for only one or two molding attempts. Overheating or repeated molding can compromise the integrity of the material.
Advanced Tips for the Best Football Mouthguard Fit
Achieving the perfect fit for your dental protector for football might require a few extra considerations and techniques.
Considerations for Different Braces:
If you wear braces, the molding process might require slight modifications to ensure comfort and protection.
- Braces-Specific Mouthguards: Many brands offer mouthguards specifically designed for athletes with orthodontic appliances. These often have a channel to accommodate the braces.
- Molding Technique: When molding a mouthguard over braces, be extra gentle. You still want to press the material around your teeth, but avoid excessive force that could damage your braces or the mouthguard. Focus on creating a smooth surface that doesn’t snag on brackets.
- Consult Your Orthodontist: It’s always a good idea to consult with your orthodontist before molding a mouthguard if you have braces. They can offer specific advice and potentially check the fit after you’ve molded it.
Ensuring Proper Upper and Lower Jaw Protection:
While most football mouthguards are designed for the upper teeth, some athletes prefer to mold them to encompass both upper and lower teeth for maximum protection.
- Upper Arch Molding: The standard molding process described above is for the upper arch. This is generally sufficient for most protection needs.
- Double Arch Mouthguards: If you opt for a double-arch mouthguard, the molding process may differ. Follow the manufacturer’s instructions precisely, as these are often designed to be molded with your teeth in a closed position.
- Breathing Concerns: Be mindful that molding both arches can sometimes make breathing more challenging. Ensure you can still breathe comfortably through your nose before deeming the fit satisfactory.
Improving Retention:
For maximum security, especially during intense play, enhancing retention is key.
- Strong Suction: The suction step is crucial for creating a tight seal. Practice sucking in firmly after placing the mouthguard in your mouth.
- Finger Pressure: Use consistent, firm pressure with your fingers around the outside of your mouth during the molding and cooling phases. This helps the material adhere snugly to your teeth and gums.
- Check for Gaps: After molding, visually inspect for any gaps or loose areas. If you find them, you may need to remold.
Longevity and Replacement:
Even the best football mouthguard, once molded, will not last forever.
- Signs of Wear: Look for thinning of the material, tears, or a loosening of the fit.
- Replacement Schedule: It’s recommended to replace your mouthguard at least once a season, or more frequently if you notice significant wear and tear. If you’ve had a major dental procedure or your dental alignment has changed, you’ll likely need to remold or get a new one.
What to Do If the Fit Isn’t Right
It’s not uncommon to need a second attempt at how to mold a football mouthguard. Don’t get discouraged!
Troubleshooting Common Fit Issues:
- Mouthguard Falls Out: This usually means you didn’t bite down firmly enough or use sufficient suction during the molding process. Try again, focusing on pressing the material firmly into the contours of your teeth and gums.
- Mouthguard Feels Too Bulky: This can happen if you didn’t press the material enough against the roof of your mouth or if the mouthguard itself is a larger design. Try to flatten the material more against the palate.
- Difficulty Breathing or Talking: Ensure the mouthguard isn’t overly thick or blocking your airway. You might need to press the material more thinly against the roof of your mouth. If it consistently hinders breathing, consider a different model.
- Gagging: If the mouthguard is too long and triggers your gag reflex, you might need to trim a small amount from the back of the mouthguard. Do this very carefully with sharp scissors after it has cooled.
When to Consider Professional Options:
While boil and bite mouthguard options are effective and affordable, they are not the only solution.
- Custom-Fitted Mouthguards: For the ultimate custom fit mouthguard and protection, consider a custom-made mouthguard from your dentist or a specialized dental lab. These are made from impressions of your teeth, offering a superior fit and often better comfort.
- When to Seek Professional Help: If you have significant dental work, braces, or simply cannot achieve a satisfactory fit with a boil and bite mouthguard, consulting your dentist is the best course of action. They can assess your needs and recommend or create the most appropriate dental protector for football.
Frequently Asked Questions (FAQ)
Here are some common questions about molding football mouthguards:
Q1: How often should I replace my football mouthguard?
A1: It’s generally recommended to replace your mouthguard at least once per season, or more often if it shows signs of wear, tearing, or a loosened fit.
Q2: Can I mold the same mouthguard multiple times?
A2: Most boil and bite mouthguard products are designed for one or two molding attempts. Overheating or repeated molding can degrade the material and compromise its protective qualities.
Q3: What is the best way to clean my football mouthguard?
A3: After each use, rinse your mouthguard with cool water. You can also clean it with a toothbrush and mild soap or a mouthwash solution. Store it in a ventilated case to prevent bacterial growth.
Q4: Does a mouthguard prevent concussions?
A4: While mouthguards are excellent at protecting teeth and jaws, scientific evidence directly linking them to concussion prevention is inconclusive. However, by reducing jarring forces to the jaw, some experts believe they may play a role in mitigating concussion severity.
Q5: Can I wear a football mouthguard with my retainer?
A5: It’s generally not recommended to wear a retainer while playing football, as it can be damaged or cause injury. If you need protection, a properly molded mouthguard is the best option, but consult your orthodontist for advice specific to your situation.
Q6: What is the difference between a stock, mouth-formed, and custom-fitted mouthguard?
A6:
* Stock: Pre-formed and not adaptable; offers minimal protection and can be bulky.
* Mouth-Formed (Boil and Bite): Made from thermoplastic material that softens in hot water for a partial custom fit. This is what most athletes use.
* Custom-Fitted: Made by a dentist from impressions of your teeth; offers the best fit, comfort, and protection.
By following these detailed steps and tips for football mouthguard molding, you can ensure your dental protector for football provides optimal sports dental protection, allowing you to play with confidence and safety. The athlete mouthguard fitting process, when done correctly, transforms a standard product into a custom fit mouthguard tailored to your unique needs.