
Can I frame a football shirt myself? Yes, you can frame a football shirt yourself, and it’s a rewarding way to showcase your passion for the sport and preserve a cherished piece of sports memorabilia. While professional services offer convenience, DIY framing allows for greater personalization and can be significantly more cost-effective. This comprehensive guide will walk you through every step of football jersey framing, from choosing the right materials to executing the perfect mount for a sports jersey, ensuring your prized possession looks stunning for years to come.
Framing a football shirt is more than just putting it in a frame; it’s about creating a sports memorabilia display that tells a story. Whether it’s the jersey of your favourite player, a signed shirt from a memorable match, or a kit representing your club, proper framing elevates its status from a garment to a treasured artifact. We’ll cover everything from framing a soccer jersey to preserving a football shirt and exploring various football jersey framing ideas.
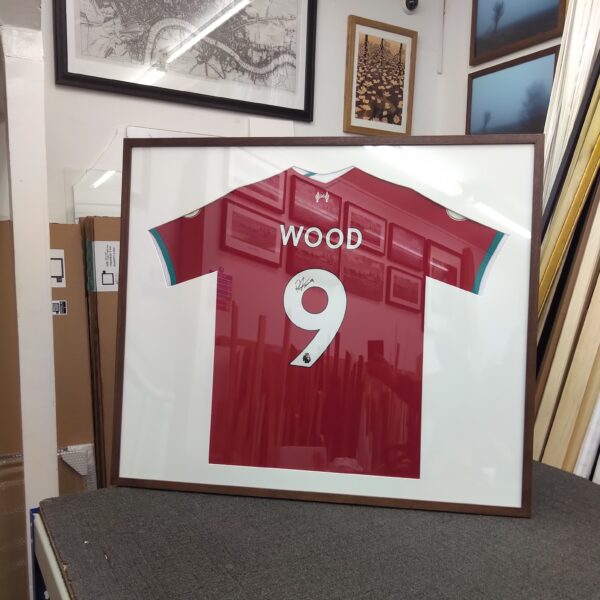
Image Source: www.sohoframes.co.uk
Essential Materials for Football Shirt Framing
Before you begin, gather all the necessary supplies. Having everything ready will make the process smoother and more enjoyable.
The Frame Itself
Choosing the right frame is crucial. Consider the size of the shirt, the overall aesthetic you desire, and the space where it will be displayed.
- Shadow Box Frames: These are the most popular choice for framing sports jerseys. They offer depth, allowing the shirt to be mounted without being pressed flat against the glass, which is essential for preserving a football shirt. A jersey shadow box provides a protective, three-dimensional display.
- Deep-Set Frames: Similar to shadow boxes, these frames have a deeper rebate to accommodate the bulk of a folded or mounted shirt.
- Custom Framing: For a truly bespoke look, consider custom jersey framing. This allows you to select the exact dimensions, frame material, matting, and even add personalized text or photos.
Mounting Materials
How you mount the shirt within the frame significantly impacts the final presentation.
- Backing Board: A rigid, acid-free board is essential for support. Foam core or mat board are common choices. Ensure it’s large enough to accommodate the shirt and any additional elements.
- Mounting Tabs or Strips: These are small, often adhesive, pieces that attach the shirt to the backing board discreetly. Look for acid-free options to avoid damaging the fabric over time.
- Stitching/Tacking: For a very secure and professional finish, some frame it by carefully stitching or tacking the shirt to the backing board. This requires a delicate touch and often a fine needle and thread.
- Mannequin or Form: Some people prefer to mount the shirt on a custom-made or appropriately sized mannequin inside the shadow box for a more realistic, worn look.
Matting and Accessories
Matting adds a professional touch and can enhance the visual appeal of your sports jersey display case.
- Acid-Free Mat Board: Crucial for preserving a football shirt. Acidic mats can yellow and damage the fabric over time. Choose neutral colours that complement the shirt.
- V-Grooves: These are decorative cuts into the mat board, often around the shirt or a photo, adding a subtle visual detail.
- Photos and Memorabilia: Consider adding photos of the player, the match, ticket stubs, or other relevant memorabilia to create a richer narrative. These should also be mounted using acid-free materials.
- Labels/Plaques: A small engraved plaque or a printed label can identify the jersey, the player, the season, or a significant event, adding context to your framed football kit.
Tools You’ll Need
- Sharp Scissors or Craft Knife: For cutting mat board and other materials.
- Ruler or Measuring Tape: For accurate measurements.
- Pencil: For marking cuts and placement.
- Gloves: To avoid transferring oils from your hands to the shirt or frame.
- Mounting Tape or Spray Adhesive (Acid-Free): For attaching photos and memorabilia.
- Small Screwdriver or Pry Tool: To open and reassemble the frame.
- Dust Brush or Microfiber Cloth: For cleaning the glass and frame.
Step-by-Step Guide to Framing Your Football Shirt
Framing a football shirt can be broken down into several manageable stages. Take your time and focus on precision at each step for the best results.
Step 1: Prepare the Football Shirt
Proper preparation is key to preserving a football shirt.
- Cleanliness: Ensure the shirt is clean. If it’s a match-worn shirt, decide if you want to preserve any signs of wear (mud, grass stains) or clean it. If cleaning, use a gentle cycle or hand-wash with mild detergent. Avoid harsh chemicals or high heat. Let it air dry completely.
- Ironing (Optional): If the shirt is very wrinkled, you can iron it on a low setting. Place a pressing cloth between the iron and the shirt for extra protection. Avoid ironing directly on any printed names, numbers, or sponsor logos, as the heat can damage them.
Step 2: Plan the Layout and Mounting
This is where you decide how the shirt will be displayed within the frame.
- Folding Techniques:
- Full Display: Mount the shirt fully spread out. This requires a larger frame and backing board.
- Folded Display: Fold the shirt neatly, either in half or thirds, to fit within the frame dimensions. This is often more practical for standard frame sizes.
- Partial Display: Show only a portion of the shirt, perhaps focusing on the crest, player number, or a signature.
- Positioning: Lay the shirt on a clean, flat surface and experiment with different positions. Consider how it will interact with any matting or additional items.
- Marking Placement: Once you’re happy with the layout, lightly mark the placement of the shirt and any other elements on the backing board.
Step 3: Mount the Shirt to the Backing Board
This is the most critical step for ensuring the shirt stays in place and is preserved.
- Using Mounting Tabs/Strips:
- Place the backing board on your work surface.
- Position the shirt on the board as planned.
- Carefully use acid-free mounting tabs or strips to secure the shirt. Attach them to the inside seams or less visible areas of the shirt and then to the backing board. Work from the collar downwards, ensuring the shirt lays smoothly without tension.
- Avoid attaching directly to prominent logos or numbers.
- Stitching/Tacking:
- If using this method, use a fine needle and strong, colour-matched thread.
- Start from the back of the backing board, pass the needle through a seam on the shirt, and back through the board.
- Make small, discreet stitches, securing the shirt at key points like the shoulders, sides, and bottom hem. This requires patience and a steady hand.
- Using a Mannequin:
- Securely attach the mannequin or form to the backing board.
- Drape the shirt over the mannequin, ensuring it hangs naturally and neatly.
- You may need to use a few discreet pins or stitches on the inside of the shirt to keep it in place on the form.
Step 4: Prepare the Matting and Accessories
If you’re using matting or adding other items, prepare them now.
- Cutting Mat Board: If you’re cutting your own mats, use a sharp craft knife and a ruler on a cutting mat. Measure twice, cut once. For openings larger than the shirt, you might create a multi-layered mat or a recessed opening.
- Mounting Photos and Memorabilia: Use acid-free photo corners, double-sided tape, or spray adhesive to attach photos, tickets, or other items to the mat board or backing board. Ensure they are positioned so they don’t obscure the main jersey.
Step 5: Assemble the Frame
Now it’s time to bring everything together.
- Layering:
- Place the backing board with the mounted shirt onto the back of the frame.
- If using matting, carefully place the mat board(s) over the shirt, aligning them correctly.
- Ensure any protective glass or acrylic is clean and free of dust.
- Securing the Backing:
- Gently close the frame, ensuring the backing board, shirt, and matting fit snugly within the frame rebate.
- Use the frame’s existing fasteners or new ones (like glazing points or staples) to secure the backing board in place. Be careful not to overtighten or damage the frame.
Step 6: Finishing Touches and Hanging
The final steps to make your sports memorabilia display ready for show.
- Cleaning: Wipe down the glass or acrylic and the frame with a clean microfiber cloth.
- Hanging Hardware: Ensure the frame has appropriate hanging hardware attached to the back. The weight of the framed shirt will dictate the type of hardware needed (e.g., D-rings and picture wire, or a heavy-duty wall hook).
- Placement: Choose a suitable location that avoids direct sunlight (which can fade colours) and extreme humidity.
Exploring Football Jersey Framing Ideas
Beyond the basic mounting, there are many creative football jersey framing ideas to make your display truly unique.
Ideas for Enhanced Presentation
- Team Colours: Use matting in your team’s primary or secondary colours to tie the framing into the jersey’s heritage.
- Player Specifics: Frame the jersey with a small photo of the player in action, their signature (if available), and perhaps a plaque detailing their stats or achievements for the club.
- Match Day Experience: Combine the jersey with a ticket stub from a significant match, a programme from the game, or even a small piece of turf from the stadium (properly preserved, of course).
- Layered Matting: Use multiple layers of mat board in different colours or thicknesses to create a more sophisticated look.
- V-Groove Accents: A V-groove around the jersey or a central photo can add a subtle but effective visual flourish.
- Internal Lighting: For a truly premium display, consider frames with integrated LED lighting to highlight the jersey.
- 3D Elements: Incorporate other 3D memorabilia like a match ball (miniature), shin guards, or boots alongside the jersey in a deep shadow box.
- Club Crest Focus: If the club crest is particularly iconic, you might design the framing to draw attention specifically to that area.
- Framed Football Kit: Don’t limit yourself to just the shirt! Consider framing shorts, socks, or even gloves as part of a complete framed football kit display.
Table: Popular Matting Colour Combinations
| Jersey Colour Scheme | Primary Mat Colour | Secondary Mat Colour (Optional) | Accent Colour (Optional) | Effect |
|---|---|---|---|---|
| Red, White, Blue | White | Navy Blue | Silver | Classic, patriotic |
| Black, Gold | Black | Cream | Metallic Gold | Rich, sophisticated |
| Green, Yellow | Forest Green | Bright Yellow | White | Vibrant, energetic |
| Blue, White | Royal Blue | White | Grey | Clean, nautical |
| Burgundy, White | Burgundy | Off-White | Dark Grey | Elegant, understated |
Preserving Your Football Shirt for Longevity
Preserving a football shirt within a frame means protecting it from environmental factors that can cause damage.
- UV-Protective Glass/Acrylic: Standard glass can block some UV rays, but dedicated UV-protective glass or acrylic is highly recommended. UV light is a primary cause of fading in fabrics and inks.
- Acid-Free Materials: As mentioned, all materials that come into contact with the shirt – backing board, matting, adhesives – must be acid-free to prevent chemical reactions that degrade the fabric.
- Archival Quality Adhesives: Use only adhesives specifically designed for archival purposes. Standard tapes and glues will yellow and damage the shirt over time.
- Proper Mounting: Avoid stretching or stressing the fabric when mounting. Ensure it’s supported without being overly tight.
- Environment: Hang your framed shirt away from direct sunlight, heat sources (radiators, fireplaces), and areas with high humidity or significant temperature fluctuations. A stable, dry environment is ideal.
- Cleaning the Frame: When cleaning the glass or acrylic, use a soft cloth and a mild glass cleaner. Avoid spraying directly onto the frame or glass; spray the cloth instead. Ensure no cleaning solution seeps into the frame.
Professional vs. DIY Football Shirt Framing
Deciding whether to go professional or DIY depends on your budget, time, and desired outcome.
Professional Framing Services
Pros:
- Expertise: Professionals have the knowledge and tools to mount and frame your shirt perfectly, ensuring maximum preservation and aesthetic appeal.
- High-Quality Materials: They typically use museum-quality, acid-free materials and specialized framing techniques.
- Convenience: Saves you time and the effort of sourcing materials and performing the framing yourself.
- Advanced Options: Access to a wider range of frame styles, matting options, and specialized glass.
- Guarantees: Reputable framing shops often offer guarantees on their work.
Cons:
- Cost: Custom jersey framing through a professional service can be expensive, often ranging from a few hundred to over a thousand dollars, depending on the complexity and materials.
- Less Personal Control: While you collaborate on the design, you don’t have hands-on involvement in the creation process.
DIY Framing
Pros:
- Cost-Effective: Significantly cheaper than professional framing, allowing you to frame multiple items or invest in higher-quality personal touches.
- Personal Satisfaction: The reward of creating a beautiful display for your cherished item yourself.
- Full Creative Control: You decide every aspect of the design and execution.
- Learning a Skill: A great way to learn a new craft.
Cons:
- Time Commitment: Requires patience, research, and dedicated time to complete the process correctly.
- Learning Curve: May involve some trial and error, especially with mounting techniques.
- Material Sourcing: You need to find reputable suppliers for acid-free materials and suitable frames.
- Potential for Error: Mistakes can happen, potentially damaging the shirt or frame if not careful.
Frequently Asked Questions (FAQ)
Q1: What is the best way to mount a football shirt for framing?
The best way to mount a football shirt is using acid-free mounting tabs or by carefully stitching it to an acid-free backing board. This provides support without damaging the fabric and allows for a smooth, wrinkle-free appearance. Avoid using staples or adhesive tape directly on the shirt.
Q2: Can I frame a shirt without a special shadow box?
Yes, you can frame a shirt without a dedicated shadow box, but you’ll need a frame with a deep enough rebate to accommodate the thickness of the mounted shirt. A standard flat frame will press the shirt against the glass, which isn’t ideal for its preservation or appearance. Look for deep-set frames or consider custom framing if a shadow box isn’t an option.
Q3: How do I frame a signed football shirt?
Framing a signed football shirt follows the same principles as framing any other shirt, with an added emphasis on protecting the signature. Ensure the signature area is not pressed against the glass. Use UV-protective glass to prevent fading, and avoid any materials that could react with or smudge the ink. Matting can be used to create a safe space between the signature and the glass.
Q4: What size frame do I need for a football shirt?
The frame size depends on how you plan to display the shirt. For a fully spread-out shirt, you’ll need a large frame, typically 30×40 inches or larger. For a folded shirt, you can use smaller frames, often around 24×36 inches or even smaller depending on the folding method. Always measure your shirt and your chosen backing board and matting before selecting a frame.
Q5: Should I wash the football shirt before framing?
It’s generally recommended to clean the shirt before framing to remove dirt, oils, and odours, which can attract pests or cause degradation over time. However, if the shirt is a precious match-worn item with significant historical or sentimental value, you might want to preserve its original state, including minor signs of wear. If you do wash it, use a gentle method, mild detergent, and air dry completely. Avoid ironing directly on printed names and numbers.
Q6: How do I prevent my framed football shirt from fading?
To prevent fading, always use UV-protective glass or acrylic in your frame. Hang the framed shirt away from direct sunlight and strong artificial light sources. Also, ensure all materials used in the framing process are acid-free, as acidic materials can contribute to degradation over time.
Framing a football shirt is a fantastic way to honour a special piece of sports history. By carefully selecting your materials, planning your layout, and executing each step with precision, you can create a stunning sports jersey display case that will be admired for years to come. Whether you opt for professional custom jersey framing or embark on a DIY project, the result will be a beautiful testament to your passion for the beautiful game.